Silicone caulk is a strong and dependable substance, but it is recommended that you remove the substance every five years and replace it with a fresh application. This caulk maintenance will help you prevent complications like peeling and cracking that could allow moisture to get behind the barrier.
Often when caulk stays in place too long mildew and mold can start to form because moisture is penetrating the caulk and getting trapped on the surface.
Caulk that has been in place for too long also looks unsightly, it discolors and often cracks or begins to peel away. Replacing caulk that is in this condition gives you a cleaner environment that is more aesthetically pleasing.
Problem: How Do You Remove Silicone Caulk From a Fiberglass Shower Stall?
Silicone caulk, when applied properly, adheres firmly, and even after the substance begins to break down with age it can still be difficult to remove it from surface materials. There are several methods you can use to get the caulking removed without damaging the surface it is supposed to be protecting.
Removing Silicone Caulk with a Scraper
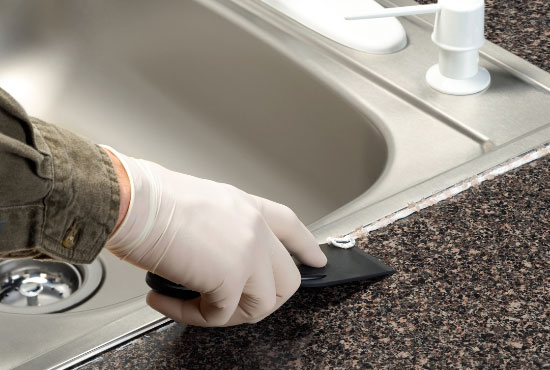
Most plumbers and home refinishing experts will tell you that you do not need a lot of harsh chemicals to effectively remove silicone caulk from a fiberglass shower stall. All you need to do this job is a scraper, a silicone caulk removal tool, or a putty knife.
If you are removing the caulk from a wooden surface or a delicate surface use a plastic putty knife instead of one with a metal blade. The plastic material will be less likely to scratch or damage the surface to the caulk.
To be honest, no matter what other method of removal you try, heat or chemical, you are still going to need a scraper to help lift away the old material.
Step 1
Look for places in the caulk that are starting to crack or peel. It will be easiest to start your removal process at a point where the rubberized material has begun to already turn loose.
Step 2
Slowly work your way along the line of caulk. Hold the putty knife at an angle and gently try to use it to get between the caulk and the surface of the shower. Each time you get the putty knife to go under the caulking slightly then use the knife to lift the material so you can break the bond it has with your shower surface.
Step 3
After you have removed the old caulk clean the area with rubbing alcohol to clear away any material that may still be sticking to your tub.
Step 4
Clean up all of the debris and wipe the surface area down with a clean dry cloth before you begin to apply a new bead of caulk.
Removing Silicone Caulk with a Heat Application
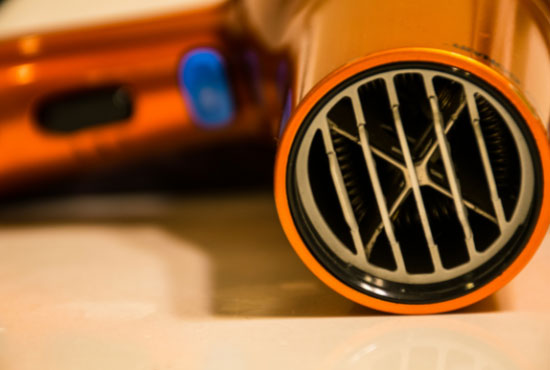
You may find that the bead of caulk you are dealing with is adhering better than you thought it was. In this case, applying heat from your blow dryer can help soften the caulk and break the bond it has.
Step 1
Set your hairdryer to a high-temperature setting. This should be around 2120 F.
Step 2
Hold the appliance about eight to ten inches away from the surface of the caulk.
Step 3
Turn the hairdryer on and hold it pointed at one area of the caulk for about forty seconds.
Step 4
Turn the dryer off and then use a putty knife or razor blade to scrape away the bits of silicone that have been softened.
Warning
If you apply the heat for too long you can damage the fiberglass of the shower stall. 40 seconds is the maximum amount of time you want to keep the heat concentrated on any area.
Tip
Work on small sections at a time so you can soften the material and remove it before it hardens again. Be sure to remove ALL of the caulk, clean the area to ensure all of the caulk is gone, and dry the area before you try to lay a new bead of caulk down.
Removing Silicone Caulk with Household Bleach
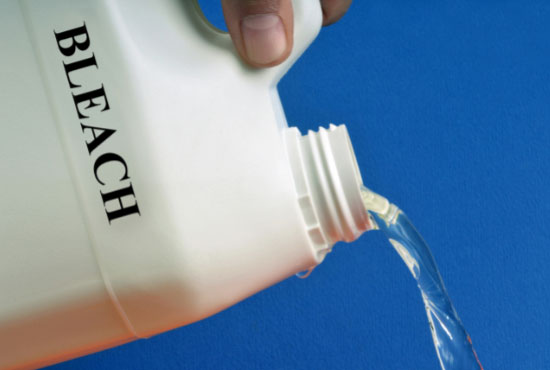
Silicone caulk can be stubborn. Sometimes pieces of the bead will be easy to remove while other pieces of the bead remain tightly bonded to your shower surface. This is frustrating but not impossible to deal with.
Household bleach applied to the caulk can help you get things softened for removal.
You need:
- Liquid Bleach
- Water
- Eye protection
- Rubber gloves
- An empty spray bottle
- A toothbrush
- Plastic putty knife
Step 1
Wear rubber gloves like dishwashing gloves to protect your hands from the bleach. You should also wear eye protection and make sure the area where you are working is properly ventilated.
Step 2
You want to mix bleach and water at a ratio of three parts water to one part bleach. Do NOT use straight bleach. It is best if you place the mixture into a spray bottle for application.
Step 3
Spray the bleach and water mixture directly onto the caulk bead. While you are spraying use the toothbrush and rub the bleach into the bead.
Step 4
Wait for a few minutes.
Step 5
Use the toothbrush to scrub the areas where you applied the bleach. Follow up using your plastic putty knife to lift away any segments of material that may be trying to hang on tight.
Step 6
Use a clean rag that has been dipped into plain water and wipe the bleach residue from the surface of the shower. Then use a dry cloth to dry away from the water. Work in small sections so your cloth is always moistened with clean water and not bleach-exposed water. This also allows you to dry the area thoroughly so moisture does not become a problem.
To make sure that all of the caulk is away, and that the surface is clean and dry, you can use an abrasive pad soaked in rubbing alcohol to clean the area. You do not normally have to dry the area after using alcohol because alcohol evaporates very quickly and will leave the surface ready for the new caulk.
Step 7
Lay a new bead of caulk on the clean and dry surface.
Removing Silicone Caulk with Chemicals
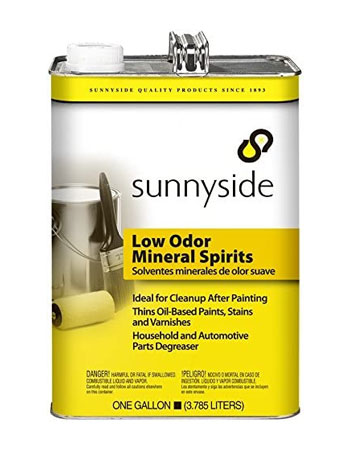
Mineral spirits or lacquer thinner are harsher than rubbing alcohol and sometimes when the caulk is especially stubborn you may need to resort to these items as helpers. They can both be applied to the caulk and when they sit on top of the caulk for a short amount of time they begin to cause the caulk to soften, which makes it easier for you to then take your trusted putty knife and start lifting away at the caulk.
There are also professionally designed substances that are made to remove silicone caulk.
Follow the instructions on the container of the chemical so you can be sure to be safe. Always make sure you are working in a well-ventilated area. Open the window in the room and never close yourself in a room while using these chemical solvents.
Wear proper eye protection and rubber gloves when working with these solvents. Do not allow any of the liquid to splash onto your clothing and if any liquid does make contact with your skin wash it away immediately with cool running water.
Use old clothes when wiping these chemicals off of a surface so you can properly dispose of the cloth instead of placing it into your washing machine.
Read the label carefully to make certain the product will not damage the surface you are applying it to.
Clean the area where the caulk was using rubbing alcohol before you att
People Also Asked
Does WD 40 Remove Silicone Sealant?
WD 40 is very effective at removing silicone from surfaces. Be sure that after you use WD 40 for this purpose you clean the area thoroughly to remove any residue left behind.
How Do You Remove Silicone from an Acrylic Shower?
You can use WD 40, or direct heat from a hairdryer to remove silicone from an acrylic shower surface. You have to apply the heat in thirty-second intervals, then use a plastic scraper to lift eh edges of the silicone. It is a slow but effective process.
Why is Silicone Caulk Hard to Remove?
Silicone caulk is a water-resistant material created primarily from silicon, oxygen, and other elements to create a polymer chain that once created is very difficult to un-create.
Read More:
1. How to Remove Spray Paint from Wood
2. How to Remove Spray Paint from Vinyl Siding